Stitch drawings, or stitch rajzok as they’re sometimes called, are more than just pretty patterns. They’re a way to bring your creativity to life.
I’ve seen a lot of confusion around what stitch drawings actually are and how to create them. It’s frustrating, right, and you just want clear, simple information.
This article is here to change that. I’ll break down what stitch drawings are, give you step-by-step instructions, and even throw in some examples. No fluff, just the stuff you need to know.
Got questions, and i’ve got answers. Let’s dive in.
What Are Stitch Drawings?
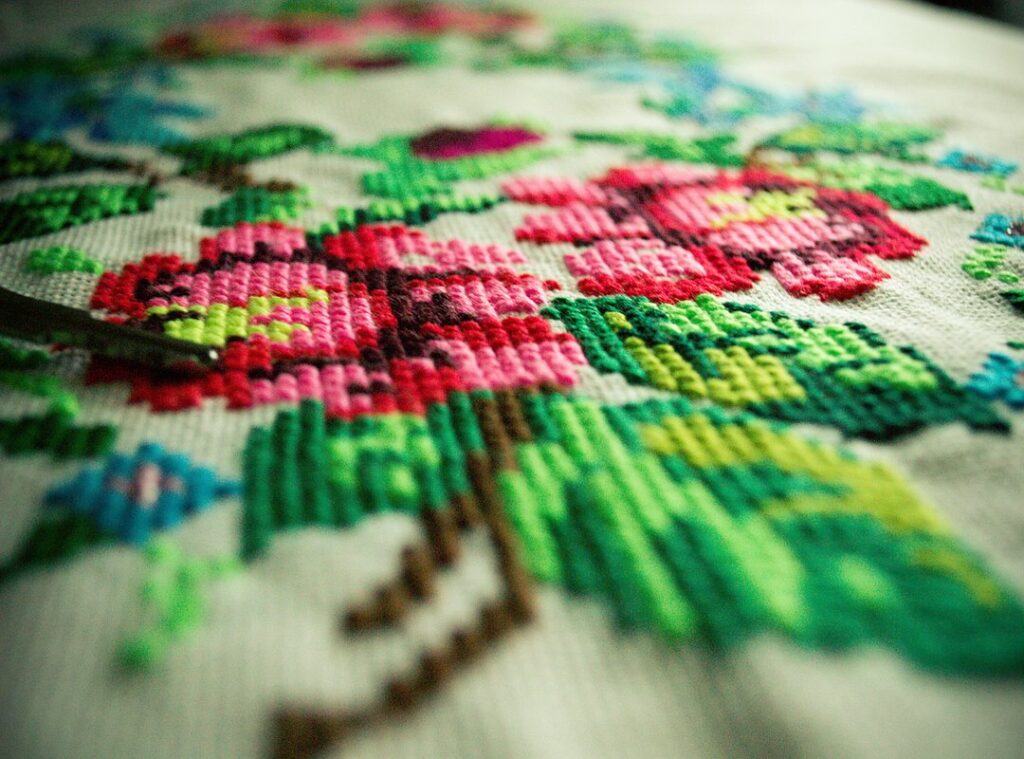
Stitch drawings are a form of textile art where designs are created by stitching thread onto fabric. Think of it like painting, but instead of a brush and paint, you’re using a needle and thread.
Stitch rajzok, as they’re known in some cultures, have a rich history. They’ve been around for centuries, with different styles emerging from various parts of the world.
Embroidery, for example, is like the fine art of stitch drawings. It’s detailed and can be as intricate as a Renaissance painting. Cross-stitch, on the other hand, is more like a pixelated image.
Each stitch is a tiny square, and when you put them all together, you get a clear, defined picture.
Needlepoint is another type. It’s like a mosaic, where each stitch is a small tile that contributes to the overall design. Each type has its own unique charm and technique, making stitch drawings a versatile and beautiful art form.
Materials Needed for Stitch Drawings
When you’re getting into stitch drawings, or stitch rajzok as some call it, having the right tools can make all the difference. Let’s start with the essentials.
First up, you’ll need needles, and simple, right? But not just any needles.
Choose ones that are comfortable to hold and fit the size of your thread. Speaking of thread, pick a variety of colors and thicknesses. This way, you can experiment and find what works best for your project.
Fabric is next, and cotton and linen are great for beginners. They’re easy to work with and forgiving if you make a mistake.
Embroidery hoops are also crucial. They keep your fabric taut and make stitching a lot easier.
Now, let’s talk about optional tools. These aren’t necessary, but they can really enhance your experience. Embroidery scissors, for example, are small and sharp, perfect for precise cuts.
Thimbles protect your fingers, especially if you’re working on a large project. And if you’re like me and need a bit more detail, a magnifying glass can be a lifesaver.
Choosing the right materials depends on what you want to create. For detailed work, go for finer threads and a high-quality, smooth fabric. If you’re doing something more rustic, thicker threads and a coarser fabric might be better.
Pro tip: Always test your materials on a small piece of fabric before starting a big project. It helps you get a feel for how everything works together.
How to Create a Stitch Drawing: Step-by-Step Guide
Step 1: Selecting a Design
Choosing the right design is key. Go for something simple if you’re a beginner. If you’re more experienced, pick a design that challenges you but isn’t overwhelming.
Step 2: Preparing the Fabric
Get your fabric ready, and iron it to remove any wrinkles. Then, transfer your design onto the fabric.
You can use a lightbox or tracing paper. Make sure the lines are clear and visible.
Step 3: Threading the Needle
Threading the needle can be a pain, but it’s essential. Cut a length of thread, about 18-20 inches. Thread it through the eye of the needle.
Tie a knot at the end to secure it.
Step 4: Starting the Stitch
Begin with a simple stitch. Push the needle through the fabric from the back to the front. Pull the thread until the knot catches.
Keep your tension even. This will make your stitches look neat and professional.
Step 5: Completing the Design
As you finish, make sure all your stitches are tight and even. To secure the ends, run the needle under a few stitches on the back of the fabric. Trim any excess thread. Roarbiznes
Pro Tip: Practice makes perfect. Don’t get discouraged if your first few attempts aren’t flawless. Stick with it, and you’ll see improvement in no time.
Stitch rajzok is a great way to express creativity and relax. Give it a try and see where your imagination takes you.
Common Stitches and Techniques
When it comes to embroidery, knowing your stitches can make all the difference. Let’s break it down.
Basic Stitches:
The running stitch is as simple as it gets. It’s just a series of even, straight stitches. Great for outlines and quick projects.
Backstitch, on the other hand, creates a solid, continuous line. It’s perfect for detailed work and adding definition.
Chain stitch forms a chain-like pattern. It’s ideal for decorative borders and adding texture.
Advanced Stitches:
French knots add a tiny, textured dot. They’re a bit tricky but worth the effort for that extra detail.
Satin stitch fills in areas with a smooth, satin-like finish. It’s all about keeping the tension right and the stitches close together.
Lazy daisy is a fun, petal-like stitch. It’s great for flowers and leaves, adding a whimsical touch to your work.
Techniques:
To achieve neat and professional-looking results, practice is key. But a few tips can help too.
- Always use a needle that fits the fabric and thread. A needle that’s too big or too small can mess up your work.
- Keep your tension consistent. Uneven tension can make your stitches look sloppy.
- Use a hoop. It keeps your fabric taut and makes stitching easier.
Stitch rajzok can be a great way to visualize and practice these techniques. Just remember, whether you’re working on a basic or advanced stitch, the goal is to enjoy the process and create something beautiful.
Examples and Inspiration
When you’re looking for stitch rajzok ideas, it’s all about finding that spark. You know, the one that makes you think, “I can do this!”
Seeing a variety of stitch drawings can be a game-changer. It helps you visualize different techniques and styles.
You might find a pattern that speaks to you or a design that challenges your skills.
Inspiration is key. It pushes you to try new things and keeps your creativity flowing.
So, whether you’re a beginner or a seasoned stitcher, having a collection of examples and project ideas can make a huge difference.
It saves you time and frustration, and it keeps the fun in your crafting.
Frequently Asked Questions (FAQs)
-
What is the best fabric for stitch drawings?
Cotton is a top choice. It’s smooth, easy to work with, and holds stitches well.Linen and evenweave fabrics are also great, especially for more detailed stitch rajzok.
-
How do I transfer a design onto fabric? Use a water-soluble pen or pencil, and trace your design onto the fabric.
If you’re not confident in your tracing, try using a lightbox or a window during the day.
-
Can I mix different types of stitches in one drawing? Absolutely, and mixing stitches can add texture and depth.
Just make sure the combination complements the overall design. Experiment and see what works best for you.
-
How do I care for my finished stitch drawing? Hand wash it gently with mild soap, and avoid wringing or twisting.
Lay it flat to dry. This keeps the fabric and threads in good condition.
Mastering the Art of Stitch Drawings
The article delves into the intricate world of stitch rajzok, exploring techniques, tools, and tips for beginners. It highlights the significance of choosing the right materials and understanding basic stitches. Practice and patience are crucial in mastering this art form.
Start your own stitch drawing project today and embrace the joy of creativity.
 Ask Elviaz Derrickson how they got into entrepreneurship tips and you'll probably get a longer answer than you expected. The short version: Elviaz started doing it, got genuinely hooked, and at some point realized they had accumulated enough hard-won knowledge that it would be a waste not to share it. So they started writing.
What makes Elviaz worth reading is that they skips the obvious stuff. Nobody needs another surface-level take on Entrepreneurship Tips, Effective Marketing Strategies, Financial Management Techniques. What readers actually want is the nuance — the part that only becomes clear after you've made a few mistakes and figured out why. That's the territory Elviaz operates in. The writing is direct, occasionally blunt, and always built around what's actually true rather than what sounds good in an article. They has little patience for filler, which means they's pieces tend to be denser with real information than the average post on the same subject.
Elviaz doesn't write to impress anyone. They writes because they has things to say that they genuinely thinks people should hear. That motivation — basic as it sounds — produces something noticeably different from content written for clicks or word count. Readers pick up on it. The comments on Elviaz's work tend to reflect that.
Ask Elviaz Derrickson how they got into entrepreneurship tips and you'll probably get a longer answer than you expected. The short version: Elviaz started doing it, got genuinely hooked, and at some point realized they had accumulated enough hard-won knowledge that it would be a waste not to share it. So they started writing.
What makes Elviaz worth reading is that they skips the obvious stuff. Nobody needs another surface-level take on Entrepreneurship Tips, Effective Marketing Strategies, Financial Management Techniques. What readers actually want is the nuance — the part that only becomes clear after you've made a few mistakes and figured out why. That's the territory Elviaz operates in. The writing is direct, occasionally blunt, and always built around what's actually true rather than what sounds good in an article. They has little patience for filler, which means they's pieces tend to be denser with real information than the average post on the same subject.
Elviaz doesn't write to impress anyone. They writes because they has things to say that they genuinely thinks people should hear. That motivation — basic as it sounds — produces something noticeably different from content written for clicks or word count. Readers pick up on it. The comments on Elviaz's work tend to reflect that.